In my last post i share a diagram about making series testing board but my last diagram about series board which is only for connectivity testing, shortage testing, or compressor terminals testing but in this post you will learn that how can you make a testing board, from which you can test the low resistance electrical appliances such as Electric heater, iron etc.
2 Pin socket or Electric outlet
One way switch
bulb socket / bulb holder
Incandescent light bulb
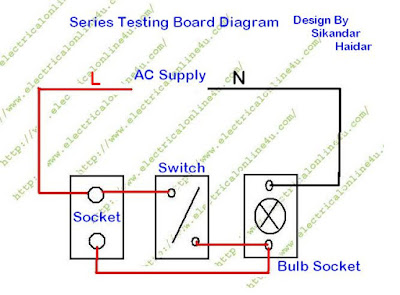
To make or wire the complete series board, fist of all connect the phase / line wire to the socket./ outlet terminals and then connect the one way switch. After t hat connect a wire between outlet 2nd terminal and bulb socket 2nd terminal, same connect an electric wire between the switch 2nd terminal and the light bulb socket/holder 2nd terminal where we connected an electric wire between socket and holder. In last connect the neutral wire to the 1st terminal of light socket/holder as shown in below diagram.

So if we want test internal short circuit in electric heater using the this testing board, first of all plug in heater shoe- in outlet and the light bulb will glow up complete but its not glow completely, its will be glowing 90 to 95 % and when we switch on the bulb will glow up to 100 %. Its means that the heater have no internal short circuit. If switch on off, the light bulb does not shown any changes in light glowing then its means that electric heater have internal short circuit and if the bulb is not glowing then its means that the electric heater have internal or external open circuit.
Requirements:
For making or wiring this type of testing board you will require the below electrical substances.2 Pin socket or Electric outlet
One way switch
bulb socket / bulb holder
Incandescent light bulb
How to make series testing board for low Resistance appliances testing
To make or wire the complete series board, fist of all connect the phase / line wire to the socket./ outlet terminals and then connect the one way switch. After t hat connect a wire between outlet 2nd terminal and bulb socket 2nd terminal, same connect an electric wire between the switch 2nd terminal and the light bulb socket/holder 2nd terminal where we connected an electric wire between socket and holder. In last connect the neutral wire to the 1st terminal of light socket/holder as shown in below diagram.

How to Test Electrical Low Resistance appliances Short Circuit By electrical testing board.
After making this type of electric wiring circuit or board we can test any electrical applianc es internal and external short circuit, e.g example if you want to test an electric heater. We know that very well that electric heater have very low internal resistance.So if we want test internal short circuit in electric heater using the this testing board, first of all plug in heater shoe- in outlet and the light bulb will glow up complete but its not glow completely, its will be glowing 90 to 95 % and when we switch on the bulb will glow up to 100 %. Its means that the heater have no internal short circuit. If switch on off, the light bulb does not shown any changes in light glowing then its means that electric heater have internal short circuit and if the bulb is not glowing then its means that the electric heater have internal or external open circuit.
Browse china copper machine products posted by copper machine manufacturers, suppliers, factories, exporters Bridon American Factory Tour Hanover Exeter, PA - Duration: 7:47. Wyoming Valley electricaltest
ReplyDeleteInteresting
ReplyDelete